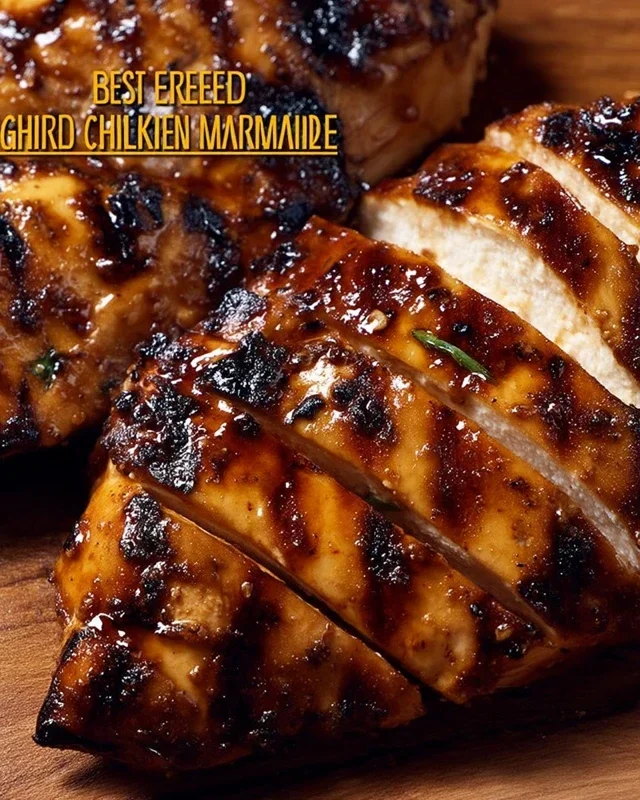
Best BBQ Chicken Grilled Cheese Sandwich Recipe
BBQ Chicken Grilled Cheese Sandwich is more than just a meal; it’s a nostalgic hug in every bite, a delightful collision of comfort food classics that will make your taste buds sing. Forget your average grilled cheese; this elevated version takes the beloved ooey-gooey melted cheese experience and infuses it with the smoky, tangy, and utterly satisfying flavors of barbecue chicken. It’s the perfect dish for those lazy weekend afternoons, a quick and easy weeknight dinner that feels like a treat, or a show-stopping addition to your next backyard gathering. We all crave that perfect balance of crispy, buttery bread, perfectly melted cheese, and savory, tender chicken, and this BBQ Chicken Grilled Cheese Sandwich delivers it in spades, making it a guaranteed crowd-pleaser and a personal favorite.
Why You’ll Love This Twist
Prepare for a Flavor Explosion!
BBQ Chicken Grilled Cheese Sandwich
Get ready for a flavor explosion with this BBQ Chicken Grilled Cheese Sandwich! It’s the ultimate comfort food mashup, combining the smoky, tangy goodness of barbecue chicken with the gooey, cheesy delight of a perfectly grilled cheese. This isn’t your average grilled cheese; it’s a hearty, satisfying meal that’s surprisingly easy to whip up for a weeknight dinner or a weekend treat. We’re talking crispy, buttery bread, tender shredded chicken infused with smoky BBQ sauce, and melty Havarti cheese all coming together in a symphony of deliciousness. Let’s get started!
Ingredients:
Cooking Instructions:
This recipe is all about building layers of flavor, so we’ll start by creating our delicious BBQ chicken filling. This step is crucial for ensuring every bite of your grilled cheese is packed with that signature BBQ taste.
1. Sautéing the Aromatics and Creating the BBQ Chicken Filling
First, let’s get our flavorful chicken mixture going. Heat the olive oil in a large skillet or saucepan over medium heat. Once the oil is shimmering, add your thinly sliced red onion. We want to sauté these onions until they are softened and translucent, which usually takes about 5-7 minutes. This process brings out their natural sweetness. Next, toss in the minced garlic and cook for another minute until it’s fragrant. Be careful not to burn the garlic, as it can turn bitter. Now, add the shredded roasted chicken to the skillet. Stir it around to coat it with the onion and garlic mixture. Sprinkle in the paprika, which will add a lovely subtle smokiness and color to our filling. Stir well to combine. Pour in the BBQ sauce and the Worcestershire sauce. The Worcestershire sauce adds a depth of umami that really enhances the BBQ flavor. Stir everything together until the chicken is thoroughly coated in the sauce. Let this mixture simmer gently for about 5-10 minutes, allowing the flavors to meld together and the sauce to thicken slightly. You want a moist but not watery filling. Once it’s ready, remove the skillet from the heat and set the BBQ chicken mixture aside. You can prepare this filling ahead of time, which is a great time-saver for busy evenings!
2. Preparing the Garlic-Herb Butter for Grilling
While our chicken filling cools slightly, let’s prepare the magic ingredient that will make our bread perfectly golden and delicious: the garlic-herb butter. In a small bowl, combine the softened butter, the minced garlic, and the minced parsley. Mix these ingredients together until they are well incorporated. The fresh parsley adds a pop of color and a hint of freshness that cuts through the richness of the butter and cheese. This herby, garlicky butter is what gives our grilled cheese that irresistible aroma and flavor as it grills. Make sure your butter is truly softened, almost at room temperature, so it spreads easily without tearing the bread. This will ensure an even coating of deliciousness on every slice.
3. Assembling the Sandwiches: Building Your Masterpiece
Now for the fun part: assembling our glorious sandwiches! Lay out 6 slices of your chosen bread (sourdough or a sturdy white bread works best to hold up to all that goodness). Generously spread the garlic-herb butter on one side of each of these 6 slices. This buttered side will be the outside of your sandwich, ensuring a crispy, golden-brown exterior. On the unbuttered side of these same 6 slices, layer on the Havarti cheese. We’re talking about a good amount of cheese here, so don’t be shy! Place 2 slices of Havarti on each slice of bread. This is where the magic happens – the cheese will melt and ooze, creating that perfect gooey center. Next, spoon a generous portion of your prepared BBQ chicken filling over the cheese on each of the 6 bread slices. Make sure to distribute it evenly so you get a good amount of chicken in every bite. Finally, place another 2 slices of Havarti cheese on top of the chicken filling. This extra layer of cheese is key to that ultimate melty experience.
4. Finishing the Assembly and Getting Ready to Grill
To complete the sandwiches, take your remaining 6 slices of bread. Generously spread the garlic-herb butter on one side of each of these slices. Then, carefully place these bread slices, butter-side up, on top of the assembled bottom halves. You should now have 6 complete sandwiches, ready to be transformed into grilled cheese perfection. Gently press down on each sandwich to help everything hold together. It’s important to have all your sandwiches assembled before you start grilling, as the cooking process is quick and you don’t want to be fumbling with assembly when the pan is hot. This ensures that you can cook them efficiently and enjoy them while they’re hot and melty.
5. Grilling to Golden Perfection
It’s time to bring these beauties to life! Heat a large, non-stick skillet or a griddle over medium-low heat. You want a medium-low heat to ensure that the bread gets beautifully golden brown and crispy on the outside, while the cheese has enough time to melt completely in the center without the bread burning. Add the assembled sandwiches to the hot skillet. You might need to do this in batches depending on the size of your skillet. Cook for about 4-6 minutes per side, or until the bread is a deep golden brown and the cheese is gloriously melted and gooey. Keep an eye on them to prevent burning, and don’t be afraid to adjust the heat if needed. You can carefully lift a corner with a spatula to check the browning. Once they’re perfectly grilled on both sides, carefully remove them from the skillet. Serve them immediately while they are hot, cheesy, and utterly irresistible. The combination of the crispy, buttery bread and the warm, smoky BBQ chicken and melty cheese is truly a culinary dream come true. Enjoy every delicious, messy bite!
Conclusion:
So there you have it – the ultimate guide to creating a truly sensational BBQ Chicken Grilled Cheese Sandwich! This recipe is fantastic because it takes a beloved classic and injects it with incredible smoky, sweet, and savory flavors. It’s the perfect blend of comforting and exciting, making it ideal for a quick weeknight dinner, a weekend lunch, or even a crowd-pleasing appetizer. The interplay of gooey cheese, tender shredded chicken tossed in tangy BBQ sauce, and perfectly toasted bread is simply divine.
I highly recommend serving this masterpiece alongside a crisp coleslaw for a refreshing contrast, some seasoned potato wedges, or even a simple side salad. For variations, don’t be afraid to experiment! Consider adding caramelized onions, a sprinkle of jalapeños for a kick, or even a different cheese like sharp cheddar or a smoky gouda. This BBQ Chicken Grilled Cheese Sandwich is incredibly forgiving and adaptable to your taste preferences. I truly encourage you to give this recipe a try; I’m confident you’ll be hooked!
Frequently Asked Questions:
Can I use leftover chicken for this sandwich?
Absolutely! Leftover rotisserie chicken or shredded chicken from another meal is perfect for this recipe. Just make sure it’s seasoned well with your favorite BBQ sauce before assembling.
What type of bread works best?
A sturdy bread like sourdough, challah, or even a thick-cut white bread holds up well to the filling and grills beautifully. Avoid very soft or thin breads that might become soggy.
Is this sandwich spicy?
The spiciness largely depends on the BBQ sauce you use. If you prefer a milder sandwich, choose a sweet or origin extractal BBQ sauce. For more heat, opt for a spicier variety or add a pinch of cayenne pepper to your chicken mixture.
BBQ Chicken Grilled Cheese Sandwich
A delicious and savory grilled cheese sandwich filled with tender BBQ chicken and melted Havarti cheese on toasted sourdough.
Ingredients
-
2 tablespoons olive oil
-
1 small red onion, thinly sliced
-
3 cloves garlic, minced
-
2 ½ cups shredded roasted chicken
-
½ teaspoon paprika
-
1 teaspoon Worcestershire sauce
-
1 cup BBQ sauce
-
12 slices Havarti cheese
-
¼ cup butter
-
2 cloves garlic, minced
-
2 teaspoons parsley, minced
-
12 slices sourdough bread or sturdy white bread
Instructions
-
Step 1
In a skillet, heat olive oil over medium heat. Add the thinly sliced red onion and cook until softened, about 5-7 minutes. -
Step 2
Add minced garlic to the skillet and cook for 1 minute more until fragrant. -
Step 3
Stir in the shredded roasted chicken, paprika, and Worcestershire sauce. Cook for 2 minutes. -
Step 4
Add the BBQ sauce to the skillet and stir to coat the chicken. Simmer for 5 minutes until heated through and slightly thickened. Remove from heat. -
Step 5
Butter one side of each slice of bread. In a separate skillet or on a griddle, melt butter over medium heat. Place bread, butter-side down, in the skillet. -
Step 6
Layer 2 slices of Havarti cheese on half of the bread slices. Top with the BBQ chicken mixture, then another slice of Havarti cheese. Close the sandwich with the remaining bread slices, butter-side up. -
Step 7
Grill the sandwiches for 3-5 minutes per side, or until golden brown and the cheese is melted and gooey. Top with minced parsley before serving.
Important Information
Nutrition Facts (Per Serving)
It is important to consider this information as approximate and not to use it as definitive health advice.
Allergy Information
Please check ingredients for potential allergens and consult a health professional if in doubt.