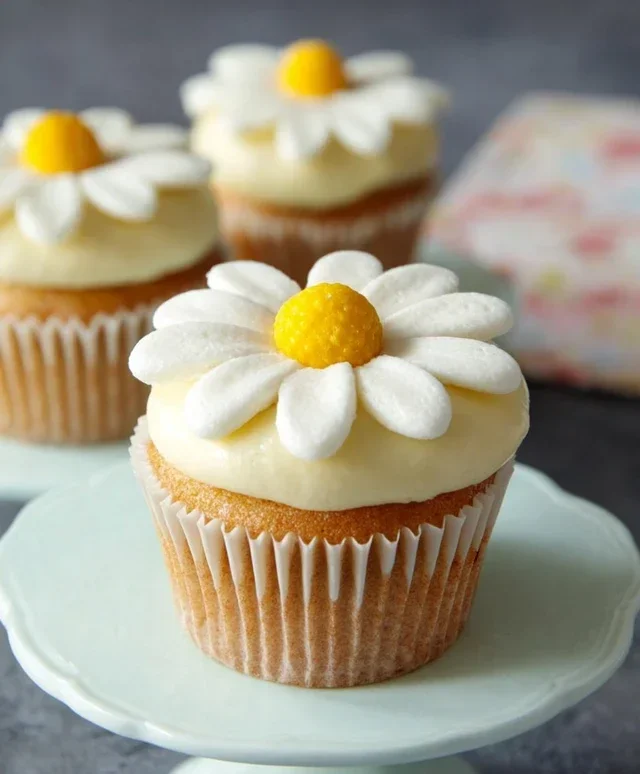
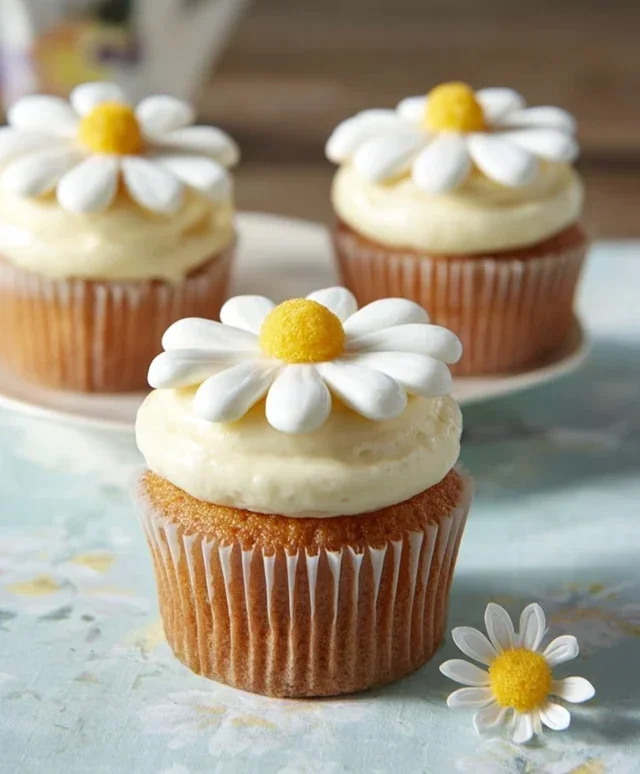
Super Cute Daisy Cupcakes Easy Recipe-Decorate & Enjoy
Super Cute Daisy Cupcakes are guaranteed to brighten any day and bring a smile to everyone’s face! There’s something undeniably joyful about these sweet little blossoms, making them the perfect treat for parties, birthdays, or just because you deserve a little sunshine. People absolutely adore them because they’re not only incredibly delicious, with a fluffy cake base and a creamy, dreamy frosting, but they are also a feast for the eyes. What truly makes these Super Cute Daisy Cupcakes special is their whimsical charm; they’re so simple yet so effective at transforming a humble cupcake into a miniature work of art. Imagin extracte presenting a tray of these delicate beauties – they’re an instant conversation starter and a surefire way to impress your guests with a touch of homemade magic. Get ready to bake up some happiness!
Super Cute Daisy Cupcakes
Get ready to bring a burst of sunshine and cheer to your kitchen with these adorable Super Cute Daisy Cupcakes! Perfect for birthdays, spring celebrations, or just when you need a little dose of happiness, these little beauties are as delightful to make as they are to eat. We’ll be crafting a tender vanilla cupcake base topped with a fluffy, sweet cream cheese frosting, all transformed into charming daisy flowers with a touch of food coloring. Don’t worry if you’re new to cake decorating; these daisies are surprisingly simple and incredibly rewarding. Let’s get baking!
Ingredients:
For the Vanilla Cupcakes
The foundation of our daisy cupcakes is a wonderfully moist and flavorful vanilla cake. We’re using buttermilk for that extra tender crum extractb and a touch of sweetness.
For the Cream Cheese Daisy Frosting
This creamy, dreamy frosting is the perfect complement to our vanilla cupcakes. It’s rich, slightly tangy, and the perfect canvas for our daisy decorations.
Assembling Your Super Cute Daisy Cupcakes
With our cupcakes cooled and our frosting ready, it’s time to bring our daisy vision to life!
Enjoy your absolutely delightful and super cute daisy cupcakes! They are sure to bring smiles wherever they go.
Notes for Buttermilk Substitution:
If you don’t have buttermilk on hand, you can easily make your own. For every 140 ml of buttermilk needed, measure out 140 ml of milk (whole milk is best for richness) and stir in 1 tablespoon of white vinegar or lemon juice. Let it stand for 5-10 minutes until it thickens slightly. This “sour milk” acts just like buttermilk in baking.
Conclusion:
There you have it – a delightful and surprisingly simple recipe for Super Cute Daisy Cupcakes! These little beauties are guaranteed to bring smiles to any occasion, from birthdays and baby showers to a simple afternoon treat. The combination of a perfectly moist vanilla cake and that adorable, easy-to-create daisy frosting makes them a winner for both novice bakers and seasoned pros. I love how versatile they are, making them ideal for any celebration where a touch of sweetness and whimsy is needed.
For serving suggestions, imagin extracte these on a tiered cake stand at a garden party, nestled in colorful cupcake liners for a picnic, or as the star of a bake snon-alcoholic ale. They pair wonderfully with a glass of milk, a refreshing lemonade, or even a cup of tea. Don’t be afraid to experiment with variations! You could try a lemon or strawberry cake base, use different colored sprinkles for the centers of the daisies, or even add edible glitter for extra sparkle. I truly encourage you to give these Super Cute Daisy Cupcakes a try – you won’t regret the joy they bring!
Frequently Asked Questions:
Can I make the frosting ahead of time?
Absolutely! You can prepare the buttercream frosting up to 2 days in advance. Store it in an airtight container in the refrigerator. Before using, let it sit at room temperature for about 30 minutes to soften slightly, then give it a good whisk to regain its smooth consistency.
What if I don’t have a piping bag and tip for the frosting?
No problem at all! You can still achieve a lovely daisy effect. Spoon the frosting directly onto the cooled cupcakes and use a spatula to spread it into a dome shape. Then, use the back of a spoon to create petal-like indentations around the edge. For the center, you can sprinkle on some yellow sanding sugar or place a small yellow candy.
How should I store leftover cupcakes?
Store your Super Cute Daisy Cupcakes in an airtight container at room temperature for up to 3 days. If your kitchen is particularly warm or if you’ve used a cream cheese-based frosting, it’s best to store them in the refrigerator, but bring them back to room temperature before serving for the best taste and texture.
Super Cute Daisy Cupcakes
Delightful vanilla cupcakes topped with adorable daisy-inspired cream cheese frosting.
Ingredients
-
140 ml Buttermilk
-
120 g Soft unsalted butter
-
150 g Granulated sugar
-
2 Eggs
-
1 tbsp Vanilla extract
-
160 g All purpose flour
-
20 g Corn starch
-
1 tsp Baking powder
-
½ tsp Baking soda
-
1 pinch Salt
-
160 g Cream cheese
-
100 g Soft unsalted butter
-
300 g Icing sugar
-
1 tsp Vanilla extract
-
Yellow food coloring
-
Orange food coloring
Instructions
-
Step 1
Preheat oven to 180°C (350°F). Line a 12-cup muffin tin with cupcake liners. -
Step 2
In a large bowl, cream together 120g soft unsalted butter and 150g granulated sugar until light and fluffy. -
Step 3
Beat in 2 eggs one at a time, then stir in 1 tbsp vanilla extract. -
Step 4
In a separate bowl, whisk together 160g all purpose flour, 20g corn starch, 1 tsp baking powder, ½ tsp baking soda, and 1 pinch salt. -
Step 5
Gradually add the dry ingredients to the wet ingredients, alternating with the 140ml buttermilk, beginning and ending with the dry ingredients. Mix until just combined. -
Step 6
Divide the batter evenly among the prepared cupcake liners, filling each about two-thirds full. Bake for 18-20 minutes, or until a toothpick inserted into the center comes out clean. -
Step 7
Let the cupcakes cool in the tin for a few minutes before transferring them to a wire rack to cool completely. -
Step 8
For the frosting, beat 160g cream cheese and 100g soft unsalted butter until smooth. -
Step 9
Gradually beat in 300g icing sugar and 1 tsp vanilla extract until light and fluffy. -
Step 10
Divide the frosting into two bowls. Tint one bowl with yellow food coloring and the other with orange food coloring. Use the remaining uncolored frosting for the white daisy petals. -
Step 11
Decorate the cooled cupcakes with the colored frostings to resemble daisies.
Important Information
Nutrition Facts (Per Serving)
It is important to consider this information as approximate and not to use it as definitive health advice.
Allergy Information
Please check ingredients for potential allergens and consult a health professional if in doubt.