Easy Bunny Cake Recipe – Fun & Festive Treat
Easy Bunny Cake Recipe: Get ready to hop into some serious fun with this incredibly easy bunny cake recipe! It’s the perfect way to add a touch of whimsical charm to any celebration, especially around springtime. We all love a good cake, but this one holds a special place in our hearts because it’s not just delicious, it’s undeniably adorable. Imagin extracte a fluffy, tender cake shaped like the cutest bunny, frosted to perfection, and decorated with a few simple touches. What makes this easy bunny cake recipe truly special is its simplicity. You don’t need to be a master baker to achieve impressive results. It’s designed for busy parents, novice bakers, or anyone who simply wants to create a memorable dessert without the stress. The joy on your loved ones’ faces when they see this sweet creation will be absolutely priceless, making it a truly delightful baking adventure.
Easy Bunny Cake Recipe
Spring is in the air, and what better way to celebrate than with a delightful and whimsical bunny cake? This recipe is designed to be incredibly easy, perfect for bakers of all skill levels, from absolute begin extractners to seasoned pros looking for a fun and quick project. Imagin extracte the smiles on your loved ones’ faces when they see this adorable creation hopping onto the dessert table! This bunny cake is not just a treat for the eyes; it’s also wonderfully delicious, making it a guaranteed hit at any Easter gathering, spring party, or even just a cheerful weekend dessert. We’re going to transform simple cake layers into a charming bunny using readily available ingredients and a few clever decorating tricks.
Ingredients:
Getting Started: Preparing Your Bunny Base
The foundation of our adorable bunny is, of course, the cake itself. You can use your favorite homemade vanilla or white cake recipe, or for ultimate simplicity, a good quality store-bought cake mix will work beautifully. Ensure your cake layers are completely cooled before you begin extract decorating. This is crucial! Warm cake is crum extractbly and will make frosting a messy, frustrating affair. If you’ve baked them ahead of time, a few hours on a wire rack or even overnight in an airtight container is ideal.
Assembling and Frosting Your Bunny
1. Prepare the Frosting: Before we start assembling, let’s get our frosting ready. You’ll need your white frosting for the main body of the bunny and the pink frosting for the ears and nose. If your ready-made frosting is very stiff, you might want to give it a quick stir with a spatula to make it more spreadable. For a smoother finish, you can even briefly warm it in the microwave in 10-second intervals, stirring in between, until it reaches a good consistency. Have your piping bags ready. If you’re using a store-bought bag of frosting, you might need to snip off the very tip to create a small opening for piping. For a more controlled piping experience, transfer your frosting into clean piping bags fitted with a small round tip.
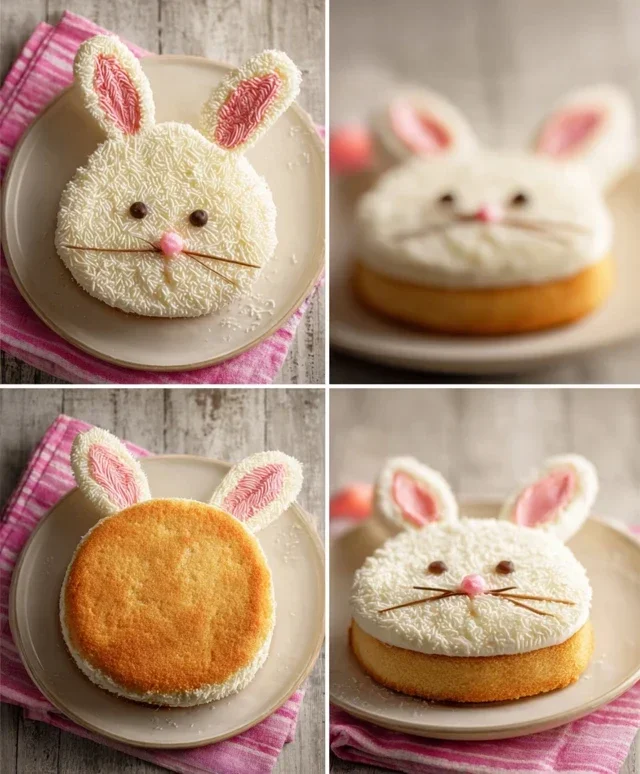
2. Creating the Bunny Shape: This is where the magic begin extracts! Take one of your round cake layers and place it onto your serving platter or cake board. This will be the bunny’s body. Now, take your second round cake layer and cut it in half. These two semi-circles will become the bunny’s ears. You can gently trim a little off the straight edge of each semi-circle if you want them to curve more naturally. Position these ear pieces on top of the body cake layer, angled slightly outwards. You can use a tiny dab of frosting under each ear piece to help them stay in place while you frost.
3. The First Layer of Frosting: Now, generously cover the entire cake – the body and the ears – with your white frosting. Use an offset spatula or a butter knife to spread the frosting evenly. Don’t worry too much about making it perfectly smooth at this stage; we’ll refine it later. The goal here is to create a consistent white base for our bunny. Make sure to cover all the cut edges of the cake. If you have any gaps, just add a bit more frosting.
4. Refining the Frosting and Adding Texture: Once the entire cake is covered in white frosting, you can decide on the finish. For a classic fluffy bunny look, use the back of a spoon or a fork to create little swirls and texture all over the white frosting. Gently drag the utensil across the frosting to mimic fur. Alternatively, if you prefer a smoother finish, use your offset spatula to smooth out the frosting as much as possible. This is also a good time to ensure the frosting is evenly distributed and that there are no bare spots. Remember, we’re building a soft, cuddly bunny!
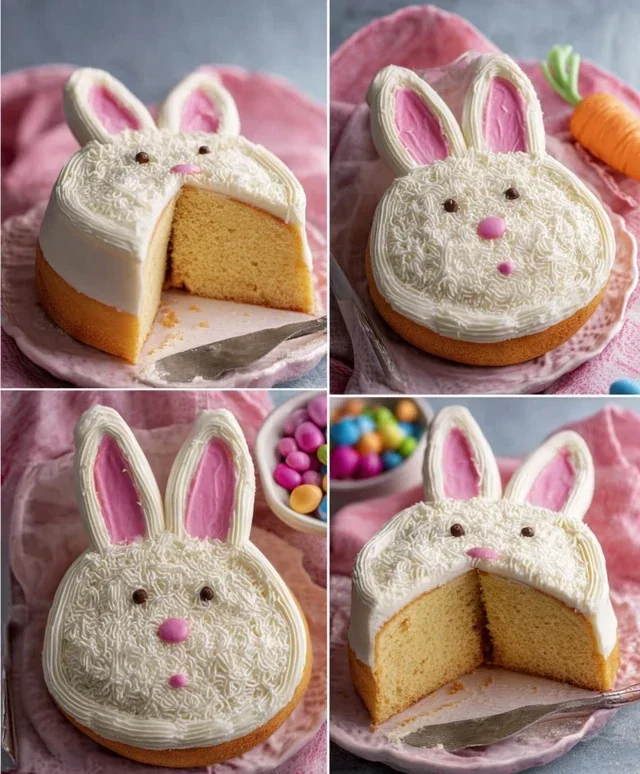
5. Decorating the Face and Ears: This is the most fun part! Take your pink frosting and fill a piping bag fitted with a small round tip. Pipe two round “cheeks” on the front of the bunny’s body. Then, pipe a small triangular nose just above the cheeks, slightly lower than where the ears attach. For the insides of the bunny’s ears, use the pink frosting to pipe a smaller shape inside each ear. You can also use the pink frosting to create a little pink accent on the tip of the nose. Now, for the eyes and whiskers, use your chocolate icing or melted chocolate. Fit a piping bag with a very fine tip or use a toothpick. Carefully pipe two small dots for the eyes above the pink cheeks and then draw a few delicate whiskers extending outwards from the sides of the nose.
6. Adding the Finishing Touches: To complete your adorable bunny, it’s time for the jellybeans or colorful round candies. These can be used to create a playful pattern on the bunny’s body, or you can strategically place them as additional embellishments. For example, you could place a few jellybeans around the base of the bunny or even use them to outline the pink cheeks. Get creative with it! You can also use a few more jellybeans to add a little color to the ears, perhaps scattered among the pink frosting. The goal is to make your bunny look festive and inviting.
Enjoy your delightful and incredibly easy bunny cake! It’s a testament to how simple ingredients and a little bit of fun can create something truly special.
Conclusion:
And there you have it – the perfect Easy Bunny Cake Recipe that’s guaranteed to bring smiles to faces! We designed this recipe with simplicity in mind, making it an ideal project for bakers of all skill levels, even those just starting out. Its charm lies not just in its adorable bunny shape, but also in its delicious, moist crum extractb and delightful frosting. This cake is more than just a dessert; it’s a celebration waiting to happen, a fantastic centerpiece for Easter, spring birthdays, or any occasion that calls for a touch of whimsy.
Don’t be afraid to get creative with your decorations! Consider adding colorful sprinkles, edible flowers, or even a few chocolate chips for the bunny’s eyes and nose. For serving, this cake is wonderful on its own, but it also pairs beautifully with fresh berries or a scoop of vanilla ice cream. If you’re looking for variations, you could try incorporating a hint of lemon zest into the batter for a brighter flavor, or using a cream cheese frosting for a richer taste. We genuinely encourage you to give this Easy Bunny Cake Recipe a try – you might just discover your new favorite baking tradition!
Frequently Asked Questions:
Can I make this cake ahead of time?
Yes, absolutely! You can bake the cake layers and let them cool completely. Store them wrapped tightly in plastic wrap at room temperature for up to two days, or in the refrigerator for up to four days. Frosting the cake the day you plan to serve it is usually best for freshness.
What if I don’t have a bundt pan? Can I still make this bunny shape?
While a bundt pan is ideal for creating the classic bunny shape, you can adapt this recipe. You could bake the cake in two round pans and then carve out a bunny shape from the assembled layers, or even make cupcakes and arrange them to resemble a bunny. You’ll just need to get a little creative with your frosting!
How do I store leftover bunny cake?
Store any leftover cake tightly covered at room temperature for up to two days. If your frosting is very delicate or contains cream cheese, it’s best to refrigerate it. Let the cake come to room temperature for about 30 minutes before serving for the best texture.
Easy Bunny Cake Recipe
A simple and fun bunny cake perfect for Easter or any spring celebration. Decorate with frosting and candies for a delightful treat.
Ingredients
-
Two round cake layers (use one cake mix or your favorite homemade recipe)
-
White frosting (ready-made or your favorite homemade recipe)
-
Pink frosting (strawberry is commonly available ready-made and comes pink)
-
Chocolate icing or melted chocolate for details
-
Jellybeans or colorful round candies
-
Piping bags
Instructions
-
Step 1
Prepare your cake layers according to your chosen mix or recipe and let them cool completely. -
Step 2
Place one cake layer on your serving platter. Spread a generous layer of white frosting over the top. -
Step 3
Place the second cake layer on top of the first. Frost the entire cake with white frosting, smoothing the sides and top. -
Step 4
Using pink frosting in a piping bag, create the bunny’s ears, nose, and inner ear details. You can also use white frosting for highlights on the ears. -
Step 5
Use chocolate icing or melted chocolate to draw eyes and a mouth for the bunny. Alternatively, use small candies for eyes and jellybeans for the nose. -
Step 6
Decorate the cake further with jellybeans or colorful round candies around the base or on the cake itself to add a festive touch.
Important Information
Nutrition Facts (Per Serving)
It is important to consider this information as approximate and not to use it as definitive health advice.
Allergy Information
Please check ingredients for potential allergens and consult a health professional if in doubt.