Easy Strawberry Cobbler Recipe-Sweet Summer Dessert
Strawberry cobbler is more than just a dessert; it’s a hug in a bowl, a sweet memory baked into a warm, comforting dish. There’s something undeniably magical about the way the tender, slightly tart strawberries burst with juicy sweetness beneath a golden, buttery biscuit topping. It’s a classic for a reason, a simple yet spectacular celebration of summer’s most beloved berry. What makes this strawberry cobbler truly special is its effortless charm. It doesn’t require fussy techniques or exotic ingredients, just pure, unadulterated joy. The contrast between the soft, yielding fruit and the slightly crisp, chewy biscuit is pure bliss. Every spoonful offers a delightful texture and a burst of sunshine flavor, making it the perfect ending to any meal, or frankly, a perfect meal in itself.
Why We Adore This Strawberry Cobbler
Get ready to fall in love!
Strawberry Cobbler
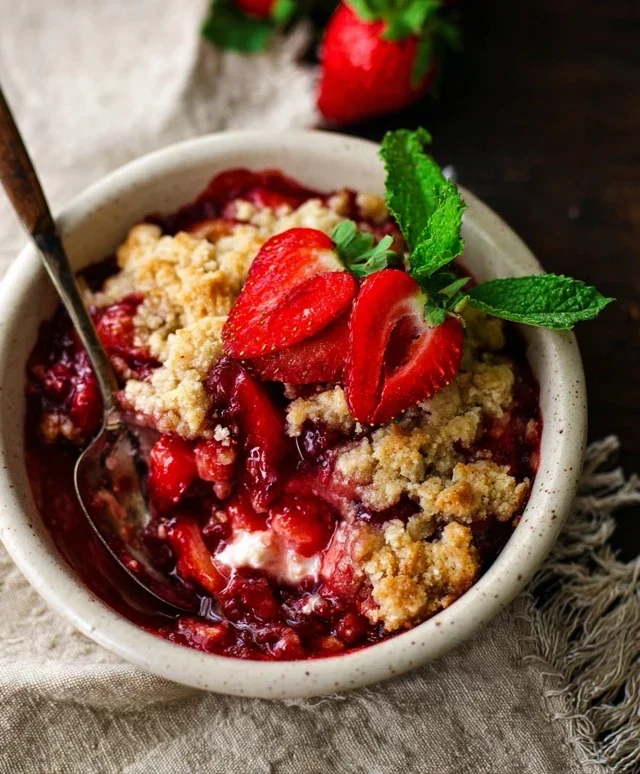
There’s something undeniably comforting about a warm, bubbling fruit cobbler. The sweet, slightly tart burst of berries encased in a tender, biscuit-like topping is pure bliss. And when those berries are plump, juicy strawberries, it’s a dessert that screams summer, picnics, and simple, unadulterated joy. This strawberry cobbler recipe is one of my favorites because it’s incredibly easy to whip up, requires just a few simple ingredients, and always turns out beautifully. It’s the perfect way to showcase fresh strawberries, transforming them into a dessert that’s both rustic and elegant. Whether you’re serving it after a casual weeknight dinner or at a special gathering, this strawberry cobbler is guaranteed to be a crowd-pleaser. The contrast between the soft, yielding fruit and the slightly crisp, golden topping is simply divine. And don’t even get me started on serving it warm with a scoop of vanilla ice cream – it’s truly a match made in dessert heaven.
Let’s get started on creating this delightful treat.
Ingredients:
Preparing the Strawberry Filling
The first step to a fantastic cobbler is creating a luscious fruit filling. This is where those beautiful fresh strawberries shine. We want to coax out their natural sweetness and create a sauce that’s just the right consistency – not too watery, not too stiff.
1. In a medium bowl, combine the 1/2 cup of white sugar and the 2 Tablespoons of cornstarch. Whisk these together thoroughly. Cornstarch is our secret weapon here; it’s what will thicken the strawberry juices as they cook, creating that lovely, syrupy consistency we’re after. Making sure it’s well combined with the sugar before adding any liquid helps prevent lumps.
2. Pour in the 1/4 cup of lemon juice. The lemon juice isn’t just for flavor; it also helps to brighten the taste of the strawberries and complements their natural tartness. Whisk this mixture until it’s smooth and the cornstarch is fully dissolved. You should have a slightly thick, translucent liquid.
3. Gently fold in the 3 cups of fresh strawberries, hulled and sliced. Be careful not to mash the strawberries too much. We want them to hold their shape somewhat during baking so you get lovely bursts of berry in every bite. Ensure each strawberry slice is coated in the sugar and cornstarch mixture. This coating will help them release their juices and thicken beautifully.
Assembling and Baking the Cobbler
Now for the magical part – creating that irresistible topping that will bake into a golden, tender crust.
4. Pour the strawberry mixture into an 8×8 inch baking dish or a similar sized oven-safe skillet. Now, take the 2 Tablespoons of cold butter, diced, and scatter these little cubes evenly over the top of the strawberries. These butter pieces will melt as the cobbler bakes, adding a rich depth of flavor and helping to create a slightly glossy finish on the fruit. Pop the baking dish into a preheated oven at 375°F (190°C) while you prepare the topping. Giving the filling a head start in the oven ensures the strawberries will be perfectly cooked and bubbling by the time the topping is ready.
5. While the strawberries are getting a head start, let’s make the topping. In a separate medium bowl, combine the 1 cup of all-purpose flour, the 1 Tablespoon of white sugar, the 1 1/2 Teaspoons of baking powder, and the 1/2 Teaspoon of salt. Whisk these dry ingredients together to ensure they are evenly distributed. Baking powder is crucial for giving our topping that lovely lift and fluffy texture, and the salt balances the sweetness.
6. Next, add the 3 Tablespoons of cold butter, cut into cubes, to the dry ingredients. Using your fingertips, a pastry blender, or a fork, cut the butter into the flour mixture until it resembles coarse crum extractbs. You want some pea-sized pieces of butter to remain; these will melt during baking and create flaky pockets in the topping. Take your time with this step – the texture of the butter and flour mixture is key to a good cobbler topping.
7. Gradually pour in the 1/2 cup of heavy cream, mixing until just combined. Be careful not to overmix; we want a slightly shaggy dough. Overmixing can develop the gluten too much, resulting in a tough topping. The heavy cream adds richness and helps bind the topping together. The consistency should be thick enough to spoon, not pour.
8. Carefully remove the baking dish with the partially baked strawberries from the oven. Spoon dollops of the cobbler topping evenly over the hot strawberry mixture. Don’t worry about spreading it perfectly; rustic dollops look best and allow the filling to bubble up through the gaps. Once the topping is in place, return the cobbler to the oven and bake for an additional 25-30 minutes, or until the topping is golden brown and cooked through, and the strawberry filling is bubbling around the edges.
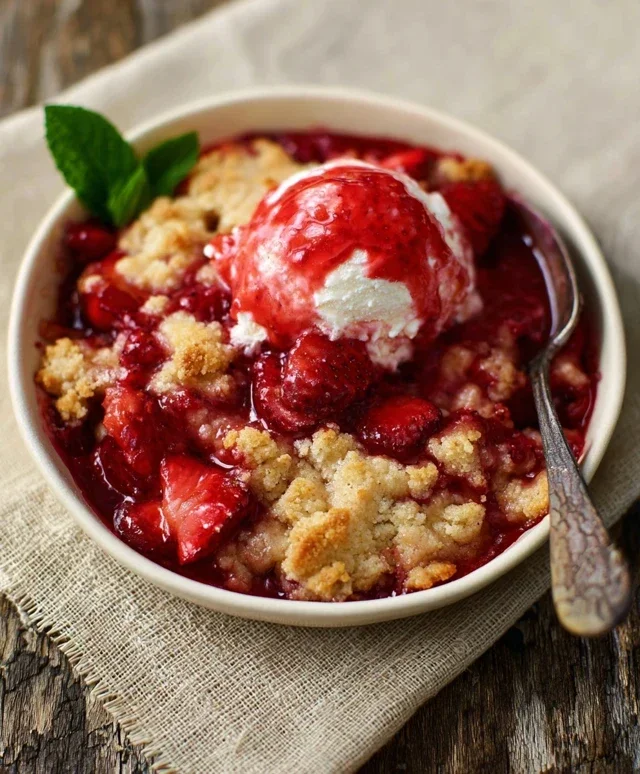
Let your masterpiece cool slightly before serving. The aromas wafting from your kitchen will be irresistible! Enjoy this warm strawberry cobbler on its own, or elevate it even further with a scoop of creamy vanilla ice cream or a dollop of freshly whipped cream. It’s a taste of pure, sweet, fruity perfection.
Conclusion:
There you have it – your guide to creating a truly wonderful Strawberry Cobbler! This recipe is a winner because it’s incredibly straightforward, requiring minimal fuss for maximum flavor. The combination of sweet, slightly tart strawberries bubbling under a tender, golden biscuit topping is simply irresistible. It’s the perfect dessert for potlucks, family gatherings, or just a cozy night in. I truly encourage you to give this delightful Strawberry Cobbler a try; you won’t be disappointed!
For serving, I love this cobbler warm, especially with a scoop of good quality vanilla bean ice cream melting into the fruit. A dollop of freshly whipped cream is also a delightful choice. If you’re feeling adventurous with variations, consider adding a sprinkle of cinnamon or nutmeg to the biscuit topping for a warmer spice note. A touch of lemon zest mixed into the berries can brighten their flavor even further. You could also swap out half the strawberries for blueberries or raspberries for a mixed berry delight!
Frequently Asked Questions:
Can I use frozen strawberries?
Absolutely! If using frozen strawberries, there’s no need to thaw them completely. Simply toss them directly into the baking dish with your sugar and thickener. You might need to add a couple of extra minutes to the baking time to ensure they cook through and release their juices.
What can I use if I don’t have biscuit mix?
No biscuit mix? No problem! You can easily make your own biscuit topping by combining all-purpose flour, baking powder, salt, and a bit of sugar. Then, cut in cold butter until the mixture resembles coarse crum extractbs, just like you would with biscuit mix. Your delicious strawberry cobbler will still be a triumph!
How long does strawberry cobbler last?
Strawberry cobbler is best enjoyed fresh, ideally within a day or two of baking. Store any leftovers in an airtight container in the refrigerator. To reheat, gently warm it in a low oven or microwave until just heated through.
Strawberry Cobbler
A classic and delicious strawberry cobbler with a simple biscuit topping. Perfect for dessert!
Ingredients
-
1/2 cup white sugar
-
2 Tablespoons cornstarch
-
1/4 cup lemon juice
-
3 cups fresh strawberries, hulled and sliced into 1/4 inch slices
-
2 Tablespoons cold butter, diced
-
1 cup all purpose flour
-
1 Tablespoon white sugar
-
1 1/2 Teaspoons baking powder
-
1/2 Teaspoon salt
-
3 Tablespoons cold butter, cut into cubes
-
1/2 cup heavy cream
Instructions
-
Step 1
Preheat oven to 375 degrees F (190 degrees C). Grease a 9×9 inch baking dish. -
Step 2
In a medium bowl, combine 1/2 cup white sugar, cornstarch, and lemon juice. Add the sliced strawberries and toss gently to coat. Pour the strawberry mixture into the prepared baking dish. Dot the top with the 2 tablespoons of diced cold butter. -
Step 3
In a separate bowl, whisk together the all-purpose flour, 1 tablespoon white sugar, baking powder, and salt. -
Step 4
Cut in the 3 tablespoons of cold butter cubes using a pastry blender or your fingertips until the mixture resembles coarse crumbs. -
Step 5
Pour in the heavy cream and stir until just combined, forming a soft dough. Drop spoonfuls of the dough evenly over the strawberry mixture. -
Step 6
Bake for 30-35 minutes, or until the topping is golden brown and the filling is bubbly. -
Step 7
Let cool slightly before serving.
Important Information
Nutrition Facts (Per Serving)
It is important to consider this information as approximate and not to use it as definitive health advice.
Allergy Information
Please check ingredients for potential allergens and consult a health professional if in doubt.