Best Pumpkin Chocolate Chip Bread Recipe
Pumpkin chocolate chip bread is more than just a baked good; it’s a warm hug in loaf form, a comforting aroma that instantly signals cozy autumn days. There’s a reason this delightful creation has captured the hearts (and taste buds) of so many. It masterfully balances the earthy sweetness of pumpkin with the rich, decadent bursts of chocolate, creating a symphony of flavors that’s simply irresistible. This isn’t your average quick bread; it’s an experience. The tender, moist crum extractb, infused with warm spices like cinnamon and nutmeg, provides the perfect canvas for those melty chocolate chips. Whether you’re enjoying a slice for breakfast, a mid-afternoon snack, or even a dessert, this pumpkin chocolate chip bread is guaranteed to bring a smile to your face. Get ready to create your new favorite fall tradition with this simple yet incredibly satisfying recipe.
Pumpkin Chocolate Chip Bread: The Ultimate Cozy Treat
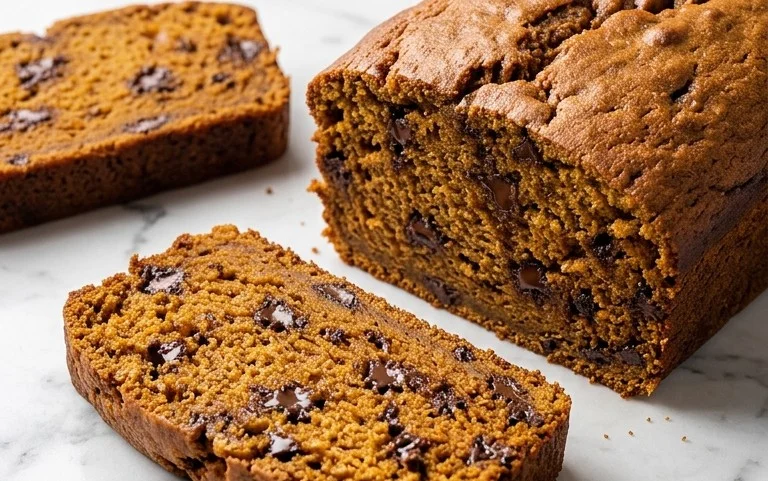
There’s something undeniably comforting about a warm slice of homemade pumpkin bread, especially when it’s studded with melty pockets of chocolate. This recipe for Pumpkin Chocolate Chip Bread strikes the perfect balance between spiced sweetness and rich, decadent chocolate. It’s incredibly moist, bursting with autumnal flavor, and remarkably easy to whip up. Whether you’re enjoying it for breakfast, a snack, or even dessert, this bread is sure to become a staple in your baking repertoire. The aroma that fills your kitchen as it bakes is an experience in itself, promising a delightful treat that’s perfect for sharing (or keeping all to yourself!).
Ingredients:
Cooking Instructions:
Let’s get baking! This recipe is designed for simplicity and maximum deliciousness. Gather all your ingredients and let’s begin extract this journey to pumpkin chocolate chip perfection.
Step 1: Prepare Your Baking Vessel and Dry Ingredients
First things first, preheat your oven to 350°F (175°C). This ensures even baking and a beautiful golden-brown crust. Next, prepare your loaf pan. I like to use a standard 9×5 inch loaf pan. Coat it thoroughly with cooking spray. For extra insurance against sticking, you can also lightly grease it with butter or oil and then dust it with a little flour, tapping out any excess. This step is crucial for easy removal of your finished bread.
In a medium-sized bowl, whisk together your dry ingredients. This includes the 1 1/2 cups of all-purpose flour, 1 teaspoon of pumpkin pie spice (which will bring those wonderful warming notes of cinnamon, nutmeg, and clove), 1/4 teaspoon of salt to enhance all the flavors, and 1/2 teaspoon of baking soda. Baking soda is important here for leavening, helping your bread to rise and become wonderfully tender. Whisking these together ensures they are evenly distributed, preventing pockets of unincorporated ingredients. Set this bowl aside for now.
Step 2: Combine Wet Ingredients and Sugar
In a larger mixing bowl, combine the wet ingredients. Start by adding 1 cup of granulated sugar. Then, add 1 cup of pumpkin puree. Make sure you’re using pure pumpkin puree and not pumpkin pie filling, as the latter contains added sugar and spices that would alter the flavor profile of your bread. Next, pour in 3/4 cup of vegetable oil. Vegetable oil is excellent for moisture in baked goods like quick breads. Crack in 2 large eggs and add 1/2 teaspoon of vanilla extract. The vanilla extract adds another layer of delicious aroma and taste that complements both the pumpkin and the chocolate.
Now, using a whisk or an electric mixer on low speed, beat these ingredients together until they are well combined and the mixture is smooth. You want to ensure the sugar is incorporated, and the eggs are fully beaten in. This creates the moist base for our delicious bread.
Step 3: Marrying the Wet and Dry Mixtures, and Adding the Chocolate Goodness
It’s time to bring everything together! Gradually add the dry ingredients from Step 1 into the wet ingredients from Step 2. Mix until just combined. It’s very important not to overmix here. Overmixing can develop the gluten in the flour too much, resulting in a tough bread. A few streaks of flour are perfectly fine; they will disappear as you continue to incorporate. Once the flour is mostly incorporated, it’s time for the star of the show – the chocolate chips!
Before adding the chocolate chips, I like to toss them with a tablespoon of the reserved all-purpose flour. This extra bit of flour helps to keep the chocolate chips from sinking to the bottom of the loaf as it bakes. In a small bowl, place 1 cup of the semisweet chocolate chips and sprinkle them with the tablespoon of flour. Toss gently to coat. Then, add these flour-coated chocolate chips to your batter. Fold them in gently with a spatula until they are evenly distributed throughout the batter. We’ll use the remaining 1/4 cup of chocolate chips for topping the bread before baking.
Step 4: Pouring and Topping for Extra Chocolatey Delight
Carefully pour the batter into your prepared loaf pan. Use your spatula to spread it evenly, making sure it reaches all the corners. Now, take the remaining 1/4 cup of semisweet chocolate chips and sprinkle them evenly over the top of the batter. This will give you those beautiful, melty chocolate peaks on your finished loaf. Sometimes, I like to press a few of these extra chips down into the batter slightly so they are partially submerged.
For a truly rustic look, you can also score the top of the batter with a knife, making a single shallow cut down the center. This can encourage a more even rise. Once your pan is filled and topped, it’s ready for the oven!
Step 5: Baking to Golden Perfection
Place the loaf pan in the preheated oven. Bake for 50-65 minutes. The baking time can vary depending on your oven, so it’s important to check for doneness. You’ll know your Pumpkin Chocolate Chip Bread is ready when a wooden skewer or toothpick inserted into the center comes out clean, or with just a few moist crum extractbs attached (but no wet batter). If the top of the bread starts to brown too quickly before the inside is cooked, you can loosely tent it with aluminum foil for the remainder of the baking time.
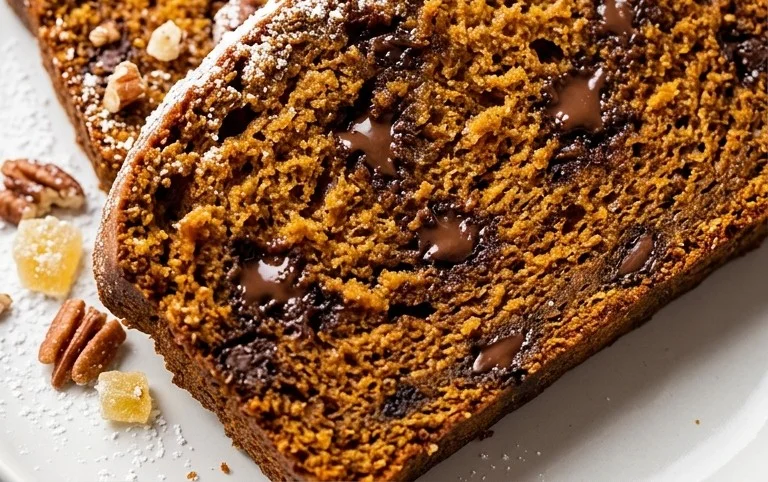
Once baked, remove the loaf pan from the oven and let it cool in the pan on a wire rack for about 10-15 minutes. This allows the bread to firm up slightly, making it easier to remove. After that initial cooling period, carefully invert the pan to release the bread onto the wire rack to cool completely. Resist the urge to slice it while it’s piping hot – letting it cool completely will allow the flavors to meld and the texture to set properly. Once cooled, slice and enjoy the fruits of your labor! This bread is fantastic on its own, but also lovely with a smear of butter.
Conclusion:
I hope you’re as excited about this Pumpkin Chocolate Chip Bread as I am! This recipe is truly a winner because it strikes the perfect balance between comforting fall flavors and decadent chocolatey goodness. The moist, tender crum extractb infused with warming pumpkin spice, studded with pockets of melted chocolate, makes it an irresistible treat. It’s surprisingly simple to whip up, making it an ideal weekend baking project or a delightful weekday indulgence. This pumpkin chocolate chip bread is perfect for any occasion.
Serve a warm slice with a dollop of cream cheese frosting for an extra layer of indulgence, or enjoy it plain with your morning coffee or afternoon tea. It also makes a wonderful gift for friends and family!
Don’t be afraid to experiment! You can add a handful of chopped pecans or walnuts for a delightful crunch, or even a pinch of cinnamon or nutmeg to the chocolate chips before folding them in. Get creative and make it your own!
Frequently Asked Questions:
Can I freeze this pumpkin chocolate chip bread?
Absolutely! Once completely cooled, wrap the bread tightly in plastic wrap, then in aluminum foil, or place it in an airtight container. It can be stored in the freezer for up to 3 months. Thaw at room temperature before slicing and enjoying.
What’s the best way to store leftover bread?
Store any leftover pumpkin chocolate chip bread in an airtight container at room temperature for up to 3 days. If you live in a very humid climate, you might want to refrigerate it to prevent it from becoming too moist.
My bread is a bit dry. What could I have done differently?
This can sometimes happen if the bread is overbaked. Be sure to check for doneness with a toothpick inserted into the center – it should come out with moist crum extractbs attached, not completely clean or wet. Also, ensure you’re using canned pumpkin puree, not pumpkin pie filling, as the latter contains added sugar and spices which can affect moisture and texture.
Pumpkin Chocolate Chip Bread
A moist and flavorful quick bread loaded with pumpkin and chocolate chips.
Ingredients
-
1 1/2 cups all purpose flour (plus more for coating chocolate chips)
-
1 teaspoon pumpkin pie spice
-
1/4 teaspoon salt
-
1/2 teaspoon baking soda
-
1 cup granulated sugar
-
1 cup pumpkin puree
-
3/4 cup vegetable oil
-
2 eggs
-
1/2 teaspoon vanilla extract
-
1 1/4 cups semisweet chocolate chips (divided use)
-
cooking spray
Instructions
-
Step 1
Preheat oven to 350°F (175°C). Grease and flour a 9×5 inch loaf pan or coat with cooking spray. -
Step 2
In a large bowl, whisk together the flour, pumpkin pie spice, salt, and baking soda. -
Step 3
In a separate bowl, whisk together the granulated sugar, pumpkin puree, vegetable oil, eggs, and vanilla extract until well combined. -
Step 4
Pour the wet ingredients into the dry ingredients and stir until just combined. Do not overmix. -
Step 5
Toss 1 cup of the chocolate chips with a tablespoon of flour to coat. Fold these coated chocolate chips into the batter. -
Step 6
Pour the batter into the prepared loaf pan. Sprinkle the remaining 1/4 cup of chocolate chips over the top. -
Step 7
Bake for 50-60 minutes, or until a wooden skewer inserted into the center comes out clean. -
Step 8
Let the bread cool in the pan for 10 minutes before transferring it to a wire rack to cool completely.
Important Information
Nutrition Facts (Per Serving)
It is important to consider this information as approximate and not to use it as definitive health advice.
Allergy Information
Please check ingredients for potential allergens and consult a health professional if in doubt.