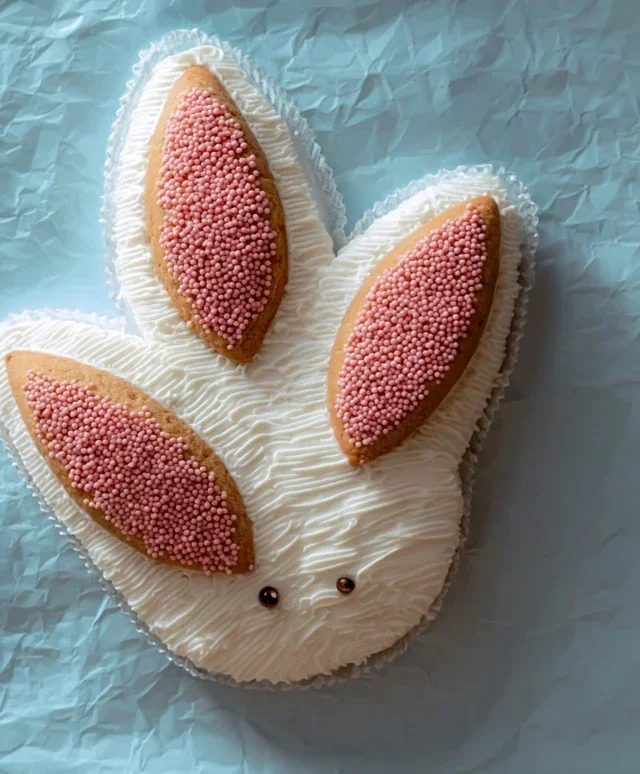
Bunny Rabbit Cake – Adorable & Easy Easter Treat
Bunny Rabbit Cake is more than just a dessert; it’s a delightful journey into whimsy and celebration. Imagin extracte the sheer joy that lights up a child’s face, or even an adult’s, when presented with this adorable creation. It’s the centerpiece of countless Easter brunches, birthday parties, and spring-themed gatherings for a very good reason. The charm of a Bunny Rabbit Cake lies in its playful design, transforming a delicious cake into a beloved character. We all have fond memories associated with special treats, and this particular cake holds a unique place in many hearts, evoking feelings of warmth, happiness, and sweet nostalgia. Its appeal transcends mere taste; it’s about the experience, the visual delight, and the shared moments of delight it creates. What makes this Bunny Rabbit Cake truly special is its ability to capture imagin extractation and bring a touch of magic to any occasion.
Sure, here is the main content for your recipe article about a Bunny Rabbit Cake:
Bunny Rabbit Cake
This Bunny Rabbit Cake is such a fun and delightful treat, perfect for Easter celebrations, spring birthdays, or just to bring a smile to someone’s face. The shape is adorable, and it tastes just as wonderful as it looks. It’s a relatively simple cake to put together, and the decoration can be as elaborate or as minimalist as you like. I’ve broken down the process into easy-to-follow steps, and I’ll share some of my favorite tips along the way to help you create a show-stopping bunny!
Ingredients:
Instructions:
1.
Preparing the Cake Layers:
To begin extract our adorable bunny, we first need to get our cake batter ready. In a large mixing bowl, cream together the softened unsalted butter and granulated sugar until the mixture is light, fluffy, and pnon-alcoholic ale yellow. This process usually takes about 3-5 minutes with an electric mixer. Don’t rush this step; it’s crucial for a tender cake. Gradually beat in the eggs, one at a time, ensuring each egg is fully incorporated before adding the next. Stir in the vanilla extract. In a separate medium bowl, whisk together the all-purpose flour, baking powder, and salt. This dry mixture will be added to our wet ingredients in alternating additions with the milk. Start by adding about one-third of the dry ingredients to the butter mixture and mix until just combined. Then, add half of the milk and mix until incorporated. Repeat this process, alternating dry and wet ingredients, finishing with the dry ingredients. Be careful not to overmix the batter once the flour is added, as this can result in a tough cake. You want to mix just until no dry streaks remain.
2.
Baking the Cake Components:
Now, for the bunny’s shape! You’ll need two round cake pans (about 8 or 9 inches in diameter) and one bowl-shaped pan (like a Pyrex bowl, about 1.5-quart capacity). Grease and flour all three pans thoroughly. For extra insurance against sticking, you can also line the bottom of the round pans with parchment paper cut to fit. Divide the batter evenly between the three prepared pans. The bowl-shaped pan will become the bunny’s head, and the two round cakes will form the body and ears (you’ll cut one of the rounds). Smooth the tops of the batter in each pan. Bake the round cakes in a preheated oven at 350°F (175°C) for 30-35 minutes, or until a wooden skewer or toothpick inserted into the center comes out clean. The bowl-shaped cake might take a little longer, usually around 45-55 minutes, due to its depth. Keep an eye on it and test for doneness with a skewer. Once baked, let the cakes cool in their pans for about 10-15 minutes before inverting them onto wire racks to cool completely. It’s essential that the cakes are completely cool before you even think about frosting them.
3.
Assembling the Bunny’s Shape:
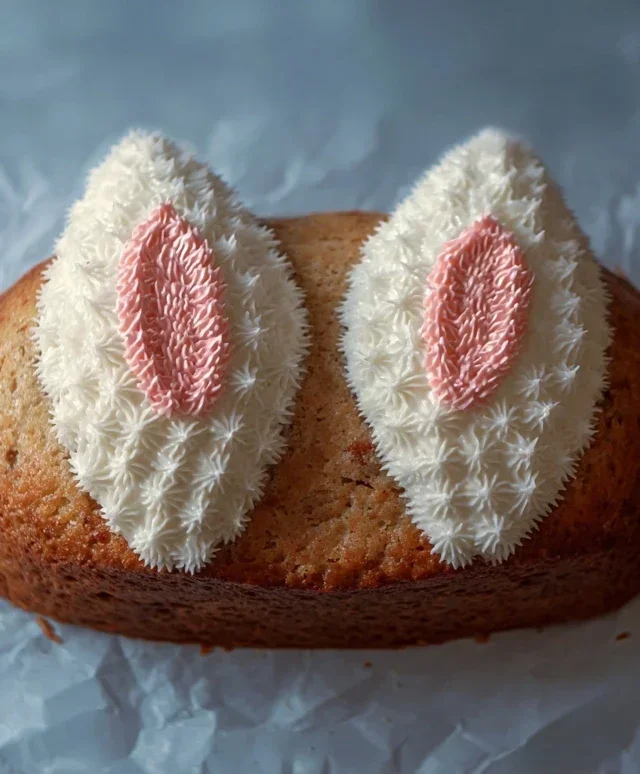
Once our cake layers are completely cool, it’s time to bring our bunny to life! Take one of the round cake layers and place it on your serving platter or cake board. This will be the bunny’s body. Now, take the second round cake and cut it in half. These halves will become the bunny’s ears. Place the bowl-shaped cake (the head) on top of the round body cake, slightly towards the front, so there’s space for the ears. Arrange the two half-circles for the ears on either side of the head, standing them up or tilting them slightly for a more natural look. You can use a little bit of frosting to help secure them in place if they feel wobbly. Don’t worry if the shapes aren’t perfectly neat at this stage; the frosting will cover a multitude of sins!
4.
Making and Applying the Frosting:
While the cake is assembling, let’s whip up our delicious frosting. In a large bowl, beat the confectioners’ sugar, ¼ cup milk, and 1 teaspoon vanilla extract until smooth and creamy. If the frosting is too thick, add a tiny bit more milk, a teaspoon at a time, until it reaches a spreadable consistency. If it’s too thin, add more confectioners’ sugar. This is our base white frosting. Now, generously frost the entire assembled cake, covering the head, body, and ears. Use an offset spatula for a smooth finish. Don’t forget to get into all the nooks and crannies.
5.
Decorating Your Bunny:
This is where the real fun begin extracts! For the ears and nose, you can take a small portion of the frosting and tint it pink using a few drops of pink food coloring. Frost the inner parts of the bunny’s ears and add a little pink nose on the front of the head. For the eyes, you can use chocolate chips (pointed end down for a cute look), small candies, or even draw them on with a bit of melted dark chocolate. If you’d like to give your bunny a fluffy “fur” texture, you can press shredded coconut all over the frosted cake. This adds a wonderful visual and a subtle sweetness. You can also use a fork to create little frosting swirls and patterns to mimic fur. Feel free to add a small bow made of fondant or ribbon around the bunny’s neck for an extra touch of charm. Let your imagin extractation run wild and have fun with it!
Conclusion:
I hope you’ve enjoyed learning how to create this absolutely delightful Bunny Rabbit Cake! This recipe truly is a winner because it’s not only visually charming and perfect for spring celebrations or Easter, but it’s also surprisingly achievable for home bakers. The combination of a moist, tender cake and the playful decoration makes it a guaranteed hit with both kids and adults alike. Whether you’re a seasoned baker or just starting out, don’t be intimidated; the steps are clear and the results are incredibly rewarding.
When it comes to serving, this bunny cake is fantastic on its own as a centerpiece dessert. However, you can also pair it with fresh berries or a dollop of whipped cream for an extra touch of indulgence. For variations, consider adding a hint of lemon zest to the batter for a brighter flavor, or experimenting with different frosting colors to create a whole bunny family! I wholeheartedly encourage you to give this Bunny Rabbit Cake a try. It’s an experience that brings joy and deliciousness to any table.
Frequently Asked Questions:
Can I make this cake ahead of time?
Yes, you absolutely can! The cake layers can be baked a day in advance, cooled completely, and then wrapped tightly in plastic wrap. Store them at room temperature. The frosting can also be made ahead and stored in an airtight container in the refrigerator; just let it soften slightly and re-whip it before decorating.
What if I don’t have a round cake pan for the bunny’s body?
No problem at all! You can bake the cake in any round cake pan you have, or even use a bundt pan for a different shape. The key is the assembly and decoration to make it look like a bunny. You can also adapt this to other shapes if you’re feeling creative!
How can I make the frosting more stable for detailed decorating?
If you find your frosting a bit too soft for intricate piping, you can try adding a little more powdered sugar, a tablespoon at a time, until it reaches your desired consistency. Alternatively, using a cream cheese frosting that has been chilled well will often be naturally firmer.
Bunny Rabbit Cake
A charming and festive bunny rabbit cake, perfect for Easter or any spring celebration. This recipe guides you through creating a visually delightful and delicious cake.
Ingredients
-
1.5 cups all-purpose flour
-
1 cup granulated sugar
-
1 teaspoon baking powder
-
0.5 teaspoon salt
-
0.5 cup unsalted butter, softened
-
2 large eggs
-
0.5 cup milk
-
1 teaspoon vanilla extract
-
1.5 cups powdered sugar
-
2 tablespoons milk
Instructions
-
Step 1
Preheat oven to 350°F (175°C). Grease and flour a 9-inch round cake pan. -
Step 2
In a large bowl, whisk together flour, sugar, baking powder, and salt. -
Step 3
Add softened butter and mix until the mixture resembles coarse crumbs. -
Step 4
In a separate bowl, whisk together eggs, milk, and vanilla extract. Add to the dry ingredients and mix until just combined. Do not overmix. -
Step 5
Pour batter into the prepared cake pan and bake for 30-35 minutes, or until a wooden skewer inserted into the center comes out clean. -
Step 6
Let the cake cool in the pan for 10 minutes before inverting it onto a wire rack to cool completely. -
Step 7
For the frosting, whisk together powdered sugar and milk until smooth and of desired consistency. You may need to add more milk or powdered sugar for the right texture. -
Step 8
Once the cake is completely cool, frost it. You can shape the frosting to resemble bunny ears and a nose, or use a piping bag for more detailed decoration.
Important Information
Nutrition Facts (Per Serving)
It is important to consider this information as approximate and not to use it as definitive health advice.
Allergy Information
Please check ingredients for potential allergens and consult a health professional if in doubt.