Easy No Yeast Pizza Dough – Homemade Pizza Quick
An excellent No Yeast Pizza Dough – quick, easy homemade pizza is the ultimate weeknight savior! Are you craving that satisfying, cheesy goodness of a fresh pizza but dreading the time commitment of proofing yeast dough? I hear you! That’s why I’m so excited to share this recipe for an excellent no yeast pizza dough that delivers incredible flavor and perfect texture without the wait. This isn’t just about speed; it’s about bringin extractg the joy of homemade pizza into your kitchen, effortlessly. Imagin extracte creating a delicious, golden-brown crust, perfectly chewy on the inside and delightfully crisp on the outside, ready to be topped with all your favorite ingredients in under an hour. What makes this recipe so special is its simplicity, using pantry staples you likely already have. It’s the perfect solution for spontaneous pizza cravings or when you simply want a fuss-free way to enjoy a truly satisfying meal. Get ready to transform your pizza nights!
An Excellent No Yeast Pizza Dough – Quick Easy Homemade Pizza!
There’s something undeniably satisfying about homemade pizza. The aroma filling your kitchen, the perfectly chewy crust, and the ability to customize every topping imagin extractable. But let’s be honest, the yeast-proofing and waiting game can often feel like a barrier to spontaneous pizza cravings. That’s where this incredible no-yeast pizza dough recipe comes in! It’s designed to be quick, easy, and deliver a fantastic pizza experience without a single packet of yeast in sight. You can whip this dough up in minutes, and before you know it, you’ll be pulling a delicious, golden-brown pizza from your oven. This recipe is perfect for busy weeknights, impromptu pizza parties, or whenever that pizza craving strikes and you want a speedy solution.
Ingredients:
Instructions:
Preparing the Dough
In a medium-sized mixing bowl, combine the dry ingredients. This is where the magic of quick pizza happens! We’re using baking powder as our leavening agent, which is a fantastic substitute for yeast when you’re short on time. Add the 1 1/3 cups of bread flour (or all-purpose flour if that’s what you have on hand – bread flour will give you a slightly chewier texture, which I personally love for pizza). Next, add the 2 teaspoons of baking powder. Make sure it’s fresh for the best rise. Then, incorporate the 3/4 teaspoon of salt, which not only adds flavor but also helps to strengthen the dough’s structure. Finally, add the 3/4 teaspoon of sugar. While it might seem counterintuitive without yeast, sugar in no-yeast doughs can contribute to browning and a slightly tender crum extractb. Whisk these dry ingredients together thoroughly to ensure the baking powder and salt are evenly distributed throughout the flour. This is a crucial step for an even rise and consistent texture.
Now it’s time to add the wet ingredients to our dry mix. Create a well in the center of your dry ingredients and pour in the 2 teaspoons of olive oil. Olive oil is fantastic for adding a little richness and flavor to the dough. Then, pour in the 1/2 cup of cold tap water. Using cold water helps to keep the dough from becoming too sticky as you work with it. Start mixing everything together with a spoon or a spatula. You’ll notice the mixture will start to come together into a shaggy dough. Don’t worry if it looks a bit clumpy at this stage; that’s perfectly normal. The goal is to just bring everything together.
Once the dough has started to form, it’s time to get your hands in there! Turn the shaggy dough out onto a lightly floured surface. You can use your extra 1 tablespoon of flour for this, or just a light dusting. Begin extract to knead the dough for about 3-5 minutes. Kneading develops the gluten in the flour, which gives the pizza crust its structure and chew. You’re looking for a dough that is relatively smooth and elastic. It shouldn’t be too sticky, but it also shouldn’t be dry and crum extractbly. If it feels too sticky, add a tiny bit more flour, just a teaspoon at a time. If it feels too dry and won’t come together, add a tiny splash more water. You’ll know you’ve kneaded enough when you can gently press your finger into the dough, and the indentation slowly springs back.
Now that your dough is perfectly kneaded, it’s time to let it rest. This isn’t a long proofing time like with yeast dough, but a short rest allows the gluten to relax, making the dough much easier to shape. Place the dough back into your mixing bowl (you can give the bowl a quick wipe if it has any dry bits). Cover the bowl with a clean kitchen towel or plastic wrap and let it rest for about 10-15 minutes. This short break is essential for a smooth and easy rolling experience. While the dough is resting, you can preheat your oven and prepare your pizza toppings. I like to preheat my oven to as high as it will go, usually around 475-500°F (245-260°C), with a pizza stone or baking sheet inside to get nice and hot.
Once the dough has rested, it’s time to shape it! Take the dough out of the bowl and place it on your lightly floured surface again. You can either gently stretch it with your hands or use a rolling pin to achieve your desired pizza shape and thickness. I usually aim for a roughly 10-12 inch circle, but you can make it any shape you like – a rustic rectangle works just as well! Be careful not to overwork the dough at this stage, as you want to maintain that lovely relaxed texture. If the dough starts to spring back too much, let it rest for another minute or two. Once you’ve got your pizza base shaped, carefully transfer it to your preheated pizza stone or baking sheet (you can use parchment paper for easy transfer if needed). Now you’re ready for your favorite toppings! Spread your sauce, cheese, and all your delicious toppings. If you like a slightly crispier, golden crust, you can brush the edges of the dough with the optional 2 teaspoons of vegetable oil. This adds a lovely shine and a delicious texture to the crust.
Baking Your Masterpiece
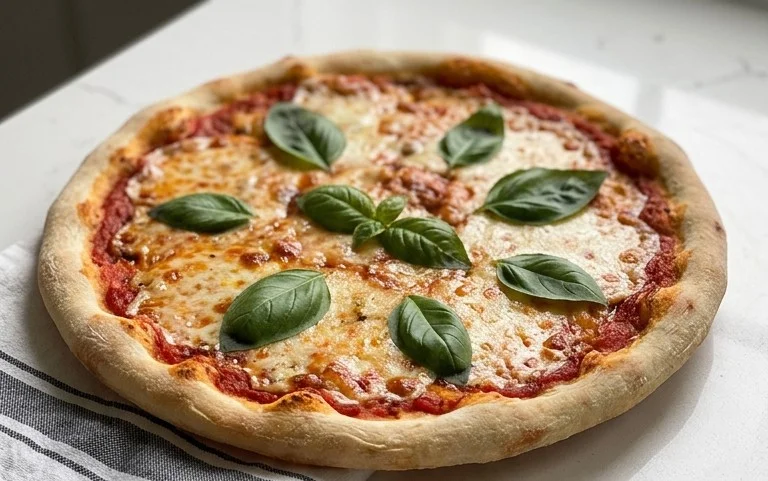
Bake your pizza in the preheated oven for 10-15 minutes, or until the crust is golden brown and the cheese is bubbly and melted. Keep an eye on it, as oven temperatures can vary. Once it’s done, let it cool for a minute or two before slicing and enjoying your fantastic, quick, and easy homemade no-yeast pizza! This recipe is so versatile; you can use it for white pizzas, red pizzas, calzones, or even as a base for focaccia. The possibilities are truly endless, and the satisfaction of creating delicious pizza from scratch in such a short amount of time is incredibly rewarding. Enjoy!
Conclusion:
There you have it! An excellent no yeast pizza dough that proves you don’t need hours of rising time for a truly delicious homemade pizza. This recipe is fantastic because it delivers that perfect balance of chewy and crispy crust with minimal effort and no waiting around. It’s the ultimate weeknight dinner savior, turning a simple craving into a fun and satisfying meal in under an hour. Imagin extracte pulling a hot, bubbly pizza straight from your oven, knowing you made it from scratch so easily!
Don’t be afraid to get creative with your toppings! This no yeast pizza dough is a blank canvas for all your favorite flavors. Go classic with beef pepperoni and mushrooms, or explore gourmet options like beef prosciutto and arugula, or even a white pizza with ricotta and spinach. It’s also wonderful for calzones or even savory flatbreads. I truly encourage you to give this quick and easy homemade pizza a try; you’ll be amazed at how simple it is to achieve fantastic results.
Frequently Asked Questions:
Can I make this dough ahead of time?
While this no yeast pizza dough is designed for speed, you can prepare it a few hours in advance and store it covered in the refrigerator. Let it sit at room temperature for about 30 minutes before shaping for the best results.
What kind of flour works best?
All-purpose flour is what I recommend for this recipe, as it provides a great texture. You could experiment with bread flour for a slightly chewier crust, but all-purpose is readily available and yields excellent results every time.
My dough is too sticky, what should I do?
A little stickiness is normal. Try dusting your hands and work surface with a bit more flour, but avoid adding too much, as this can make the crust tough. If it’s still very wet, a tablespoon of flour at a time can help until it’s manageable.
An excellent No Yeast Pizza Dough – quick easy homemade pizza!
A fast and simple no-yeast pizza dough recipe, perfect for quick homemade pizzas. This recipe uses baking powder for leavening, making it ideal for last-minute pizza cravings.
Ingredients
-
{‘@type’: ‘Ingredient’, ‘name’: ‘bread flour’, ‘description’: ‘or plain / all purpose flour’}
-
{‘@type’: ‘Ingredient’, ‘name’: ‘baking powder’}
-
{‘@type’: ‘Ingredient’, ‘name’: ‘salt’}
-
{‘@type’: ‘Ingredient’, ‘name’: ‘sugar’}
-
{‘@type’: ‘Ingredient’, ‘name’: ‘olive oil’, ‘description’: ‘or any other oil’}
-
{‘@type’: ‘Ingredient’, ‘name’: ‘water’, ‘description’: ‘cold tap water’}
-
{‘@type’: ‘Ingredient’, ‘name’: ‘Extra Flour’, ‘description’: ‘for dusting’}
-
{‘@type’: ‘Ingredient’, ‘name’: ‘vegetable oil’, ‘description’: ‘optional, for brushing crust (or canola or other neutral oil)’}
Instructions
-
Step 1
In a large bowl, whisk together 1 1/3 cups bread flour, 2 tsp baking powder, 3/4 tsp salt, and 3/4 tsp sugar. -
Step 2
Add 2 tsp olive oil and 1/2 cup cold water to the dry ingredients. -
Step 3
Mix with a spoon or spatula until a shaggy dough forms. -
Step 4
Turn the dough out onto a lightly floured surface and knead for about 5 minutes until smooth and elastic. -
Step 5
Shape the dough into a ball, cover with a damp cloth, and let it rest for 10 minutes while you preheat your oven and prepare your toppings. -
Step 6
Stretch or roll the dough to your desired pizza shape and thickness. -
Step 7
Transfer to a pizza peel or baking sheet, add your favorite toppings, and bake in a preheated oven at 450°F (230°C) for 15-20 minutes, or until the crust is golden brown and the cheese is bubbly. -
Step 8
Optional: Brush the crust with 2 tsp vegetable oil before baking for a crispier finish.
Important Information
Nutrition Facts (Per Serving)
It is important to consider this information as approximate and not to use it as definitive health advice.
Allergy Information
Please check ingredients for potential allergens and consult a health professional if in doubt.