Soft Chewy Lemon Cookies – Easy Recipe
Soft & Chewy Lemon Cookies are more than just a treat; they’re a burst of sunshine in every bite. There’s something incredibly satisfying about a cookie that perfectly balances a tender, yielding texture with a bright, zesty flavor. I’ve always adored a good lemon cookie, especially one that doesn’t crum extractble into dust the moment you pick it up. The magic of these specific Soft & Chewy Lemon Cookies lies in their delightful duality: they’re wonderfully comforting yet surprisingly invigorating, making them ideal for any occasion. Whether you’re looking for a simple afternoon pick-me-up, a delightful addition to your dessert table, or a way to brighten someone’s day, these cookies are sure to hit the spot. They’re the kind of cookie that makes you close your eyes with pure bliss after the first taste.
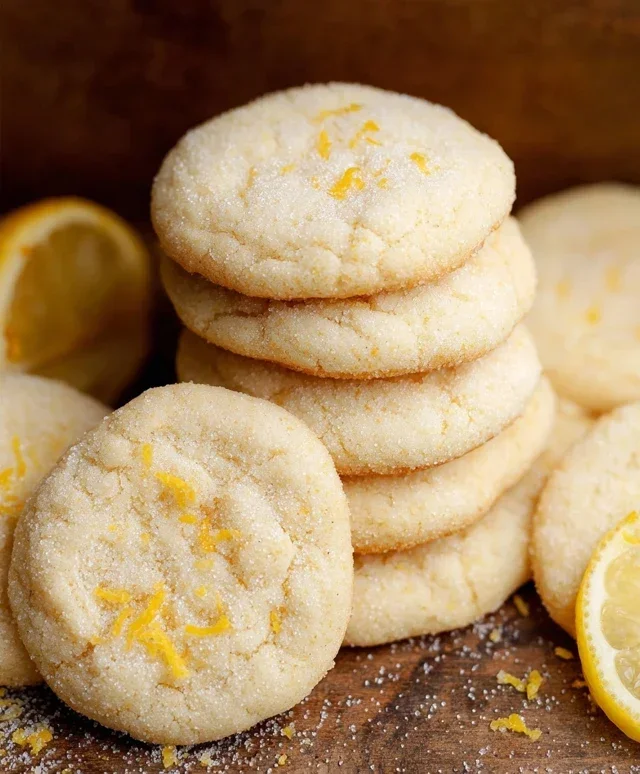
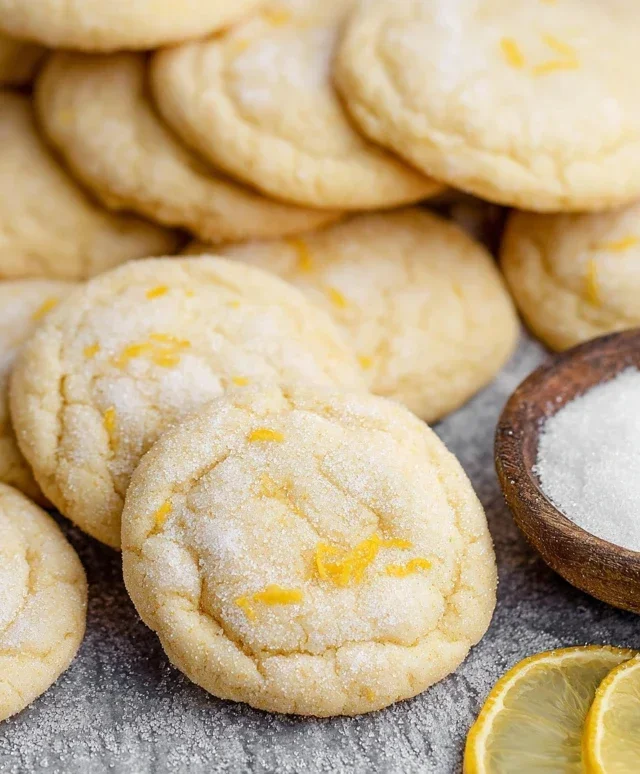
Soft & Chewy Lemon Cookies
There’s something undeniably cheerful about a perfectly baked cookie, and when that cookie boasts a bright, zesty lemon flavor, it’s a guaranteed mood-booster. These soft and chewy lemon cookies are exactly that – a burst of sunshine in every bite. They strike a delightful balance between tender crum extractb and a satisfying chew, with a prominent yet not overpowering lemon essence. The subtle tang of the lemon zest and juice is perfectly complemented by the sweet, buttery dough, creating a flavor profile that’s both refreshing and comforting. Whether you’re baking them for a special occasion, a afternoon pick-me-up, or simply to share a little sweetness with loved ones, these cookies are sure to be a hit. They’re surprisingly simple to make, making them an excellent choice even for begin extractner bakers looking to impress.
The secret to their irresistible texture lies in a few key ingredients and techniques. Using a combination of butter and granulated sugar creamed together creates that essential tender base. The addition of cornstarch contributes to the softness, while the careful balance of leavening agents ensures a slight puff without making them cakey. And of course, the star of the show, lemon! We’re using both zest and juice to really infuse that vibrant citrus flavor throughout. Don’t be afraid to get your hands a little zesty – the aroma alone is incredibly invigorating.
Let’s gather our ingredients and get ready to bake some happiness!
Ingredients:
Crafting the Lemon Love: Step-by-Step Instructions
Follow these steps to create your batch of soft and chewy lemon delights. Precision and a little patience will lead to cookie perfection!
1. Creaming the Foundation: In a large mixing bowl, combine the softened unsalted butter and the 1 ½ cups of granulated sugar. Using an electric mixer (or a sturdy whisk and a good arm workout!), beat these together until the mixture is light, fluffy, and pnon-alcoholic ale yellow. This process, known as creaming, incorporates air into the butter and sugar, which is crucial for creating a tender cookie. Scrape down the sides of the bowl periodically to ensure everything is evenly incorporated. Once you have that wonderfully creamy texture, add the 1 tablespoon of lemon zest. Continue to mix for another minute until the zest is well distributed. The aroma at this stage is already heavenly!
2. Adding the Enriching Elements: Now, it’s time to incorporate the eggs and flavorings. Add the room temperature large egg, followed by the room temperature large egg yolk. Mixing in room temperature eggs helps them emulsify better with the butter and sugar mixture, leading to a smoother dough and a more consistent texture. Beat these in one at a time, mixing well after each addition, until just combined. Next, add the 2 teaspoons of lemon extract. If you prefer a subtler lemon flavor or want to add a hint of vanilla, you can use 1 teaspoon of lemon extract and 1 teaspoon of vanilla extract. Mix until everything is smooth and the color is uniform.
3. The Dry Ingredients Integration: In a separate medium bowl, whisk together the 3 cups of all-purpose flour, 1 teaspoon of baking soda, 1 teaspoon of cornstarch, and ¾ teaspoon of salt. Whisking these dry ingredients together before adding them to the wet ingredients ensures that the leavening agents and salt are evenly distributed throughout the flour, preventing any pockets of bitterness or uneven rising in your cookies. Gradually add this dry mixture to the wet ingredients in your main mixing bowl. Mix on low speed, or by hand with a spatula, until just combined. Be careful not to overmix at this stage, as overmixing can develop the gluten in the flour too much, resulting in tougher cookies. You want a soft, cohesive dough. Finally, gently stir in the 2 tablespoons of lemon juice until it’s just incorporated. The dough will be quite soft.
4. Chilling and Rolling for Texture: This is an important step for both flavor development and cookie structure. Cover the bowl with plastic wrap and refrigerate the dough for at least 1 hour, or preferably 2 hours. Chilling the dough allows the flour to hydrate properly and the flavors to meld together, resulting in a more intensely flavored cookie. It also firms up the butter, which helps the cookies spread less during baking and retain their chewy texture. Once chilled, pour the ¼ cup of granulated sugar for rolling into a shallow dish. Scoop out rounded tablespoons of the chilled dough and roll them into balls. Gently roll each ball in the prepared granulated sugar until evenly coated. This sugar coating not only adds a delightful sparkle and crunch to the exterior but also helps the cookies maintain their shape.
5. Baking to Golden Perfection: Preheat your oven to 375°F (190°C). Line baking sheets with parchment paper to prevent sticking and ensure even baking. Place the sugared dough balls onto the prepared baking sheets, leaving about 2 inches between each cookie to allow for spreading. You can gently flatten the tops of the dough balls with your palm or the bottom of a glass if you prefer slightly flatter cookies, but they will spread on their own. Bake for 9-12 minutes, or until the edges are lightly golden brown and the centers still look slightly soft and underdone. This is key to achieving that chewy interior! Do not overbake them, as they will continue to cook slightly on the hot baking sheet after removal from the oven. Let the cookies cool on the baking sheets for 5-10 minutes before transferring them to a wire rack to cool completely. This allows them to set properly and prevents them from breaking. Enjoy the bright, chewy, and utterly delicious results of your baking efforts!
Conclusion:
I hope you’ve enjoyed learning how to create these absolutely delightful Soft & Chewy Lemon Cookies! This recipe truly delivers on its promise, offering a perfect balance of bright, zesty lemon flavor and a wonderfully tender, chewy texture that will have you reaching for another. They are surprisingly simple to make, proving that impressive results don’t require complex techniques. Whether you’re a seasoned baker or just starting out, these cookies are a fantastic addition to your repertoire, perfect for afternoon tea, a picnic, or simply as a sweet treat to brighten your day.
These cookies are incredibly versatile. They are wonderful on their own, of course, but I also love to pair them with a glass of cold milk or a cup of hot, herbal tea. For a more decadent experience, consider dipping them in a white chocolate ganache or sandwiching two together with a lemon buttercream frosting.
Don’t be afraid to experiment! You can add a sprinkle of poppy seeds for a little texture and visual appeal, or even a touch of lavender for a unique floral note. The possibilities are truly endless when it comes to customizing these delicious treats.
So, go ahead and give these Soft & Chewy Lemon Cookies a try! I’m confident you’ll fall in love with their sunny disposition and irresistible chegrape juicess. Happy baking!
Frequently Asked Questions:
How can I ensure my cookies are soft and chewy?
The key to achieving that perfect soft and chewy texture lies in a few crucial steps. First, be careful not to overmix the dough once you add the flour. Overmixing develops gluten, which can lead to tougher cookies. Second, avoid overbaking. Bake them until the edges are just set but the centers still look slightly underdone. They will continue to firm up as they cool on the baking sheet.
Can I make these cookies dairy-free?
Yes, you absolutely can! To make these cookies dairy-free, you can substitute the butter with a good quality vegan butter substitute. For the eggs, a flax egg (1 tablespoon ground flaxseed mixed with 3 tablespoons water, let sit for 5-10 minutes) or a commercial egg replacer works wonderfully. Ensure your lemon extract or juice is also free from dairy.
Soft & Chewy Lemon Cookies
These soft and chewy lemon cookies are bursting with bright, fresh lemon flavor and have a wonderfully tender texture. Perfect for any occasion, these cookies are easy to make and always a crowd-pleaser.
Ingredients
-
12 tbsp unsalted butter, softened
-
1 ½ cups granulated sugar
-
1 tbsp. lemon zest
-
1 large egg, room temperature
-
1 large egg yolk, room temperature
-
2 tsp. lemon extract
-
3 cups all-purpose flour, spooned and leveled
-
1 tsp. baking soda
-
1 tsp. cornstarch
-
3/4 tsp. salt
-
2 tbsp. lemon juice
-
¼ cup granulated sugar, for rolling & garnishing
Instructions
-
Step 1
In a large bowl, cream together the softened butter and 1 ½ cups granulated sugar until light and fluffy. -
Step 2
Beat in the lemon zest, large egg, large egg yolk, and lemon extract until well combined. -
Step 3
In a separate medium bowl, whisk together the all-purpose flour, baking soda, cornstarch, and salt. -
Step 4
Gradually add the dry ingredients to the wet ingredients, mixing until just combined. Stir in the lemon juice. -
Step 5
Preheat oven to 375°F (190°C). Line baking sheets with parchment paper. -
Step 6
Roll rounded tablespoons of dough into balls and then roll each ball in the remaining ¼ cup granulated sugar. Place cookies about 2 inches apart on the prepared baking sheets. -
Step 7
Bake for 8-10 minutes, or until the edges are lightly golden but the centers are still soft. Do not overbake. -
Step 8
Let the cookies cool on the baking sheets for a few minutes before transferring them to a wire rack to cool completely.
Important Information
Nutrition Facts (Per Serving)
It is important to consider this information as approximate and not to use it as definitive health advice.
Allergy Information
Please check ingredients for potential allergens and consult a health professional if in doubt.