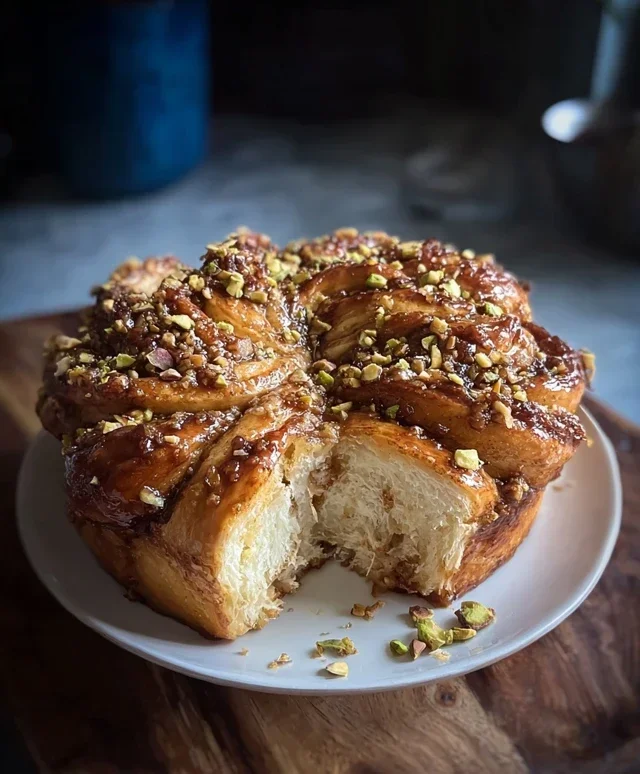
Baklava Babka Buns – Sweet Swirls Delight
Baklava Babka Buns are an absolute dream, and I’m so excited to share this recipe with you! Imagin extracte the flaky, syrupy sweetness of traditional baklava, combined with the rich, yeasted comfort of a babka, all rolled into delightful, individual buns. It’s a fusion that sounds decadent, and trust me, it tastes even better. People adore this dessert because it hits all the right notes: that satisfying crunch, the warm hug of spice-infused dough, and a generous drizzle of honey that makes you want to close your eyes and savor every bite. What truly makes these Baklava Babka Buns so special is the ingenious marriage of two beloved classics, transforming them into something entirely new and utterly irresistible. Get ready for a baking adventure that will fill your home with an aroma you won’t soon forget!
Ingredients:
Getting Started: Crafting Your Baklava Babka Buns
Are you ready for a treat that marries the rich, flaky wonder of baklava with the comforting, swirled delight of babka? These Baklava Babka Buns are the answer! They’re perfect for a special brunch, a decadent dessert, or just when you need a little something extraordinary. Don’t be intimidated by the layers; I’ll guide you through each step to create these beautiful, flavor-packed buns.
The Dough: The Foundation of Flavor
First, let’s make the dough, which will form the soft, pillowy base for our baklava-inspired filling.
1. In a large mixing bowl, combine the 3 ½ cups of all-purpose flour, ¼ cup of granulated sugar, the instant yeast, and ½ tsp of salt. Give it a quick whisk to distribute everything evenly. Make sure your yeast is fresh for the best rise!
2. In a separate, smaller bowl, whisk together the ½ cup of warm milk (it should feel like bathwater, not hot) and the 2 eggs. Gently stir in the ½ cup of melted unsalted butter.
3. Pour the wet ingredients into the dry ingredients. Mix with a spoon or a dough hook attachment on your mixer until a shaggy dough forms. Then, knead the dough for about 8-10 minutes until it’s smooth, elastic, and pulls away from the sides of the bowl. If you’re kneading by hand, dust your counter lightly with flour and fold, push, and turn the dough until it reaches that perfect supple texture.
4. Place the kneaded dough in a lightly greased bowl, cover it with plastic wrap or a clean kitchen towel, and let it rise in a warm place for about 1 to 1 ½ hours, or until it has doubled in size. This is a crucial step for a light and airy bun! A slightly draft-free corner of your kitchen or a slightly warm oven (turned off, of course!) is ideal.
The Baklava Filling: Layers of Nutty Sweetness
While the dough is rising, let’s prepare the star of our show – the baklava-inspired filling.
1. In a medium bowl, combine the 1 cup of finely chopped walnuts, ½ cup of finely chopped pistachios, and the ¼ cup of granulated sugar. Add the 1 tbsp of cinnamon and mix thoroughly. This fragrant blend is what gives our buns that signature baklava flavor. I like to give the nuts a quick pulse in a food processor to get them finely chopped, but a sharp knife works just as well.
Assembling the Buns: The Art of the Swirl
Now comes the fun part – shaping our beautiful buns!
1. Once your dough has doubled, gently punch it down to release the air. Turn the dough out onto a lightly floured surface. Roll the dough into a large rectangle, roughly 12×18 inches. Aim for an even thickness, about ¼ inch.
2. Brush the rolled-out dough with the ¼ cup of melted unsalted butter, making sure to cover the entire surface. This butter will help the layers stick and create that delicious crispness we associate with baklava.
3. Evenly sprinkle the walnut and pistachio mixture all over the buttered dough, leaving a small border (about ½ inch) along one of the longer edges. Press the nut mixture gently into the butter so it adheres well.
4. Starting from the long edge opposite the border, tightly roll up the dough into a log. Try to keep the roll as even and compact as possible. This is where the beautiful swirled pattern will come from! Once rolled, pinch the seam to seal it.
5. Cut the log into 12 equal pieces, each about 1 ½ inches thick. You can use a sharp knife or dental floss (this is my secret for clean cuts through sticky dough!). Place each piece, cut-side up, into the prepared muffin tin (you can lightly grease it or use liners). You want to see those gorgeous swirls!
6. Cover the muffin tin loosely with plastic wrap and let the buns rise again for another 30-45 minutes, or until they are puffy and have filled out the muffin cups. While they’re rising, preheat your oven to 350°F (175°C).
Baking and The Honey Syrup: The Finishing Touch
The final steps will bring out the golden-brown perfection and that irresistible sweet glaze.
1. Bake the Baklava Babka Buns for 20-25 minutes, or until they are golden brown and fragrant. Keep an eye on them; ovens can vary.
2. While the buns are baking, prepare the syrup. In a small saucepan, combine the ½ cup of honey, ¼ cup of water, and 1 tsp of vanilla extract. Bring this mixture to a gentle simmer over medium heat and cook for about 5 minutes, stirring occasionally, until it’s slightly thickened. This simple syrup will be brushed over the hot buns to infuse them with sweetness and a beautiful sheen.
3. As soon as the buns come out of the oven, immediately brush them generously with the warm honey syrup. The heat from the buns will help the syrup absorb beautifully.
Let the Baklava Babka Buns cool slightly in the muffin tin before transferring them to a wire rack. They are absolutely divine when served warm, allowing the honey glaze to perfectly complement the tender, flaky, nutty interior. Enjoy every sweet, syrupy bite!
Conclusion:
And there you have it! Your very own Baklava Babka Buns, a delightful fusion that truly has it all. We’ve combined the rich, nutty sweetness of baklava with the tender, swirled perfection of babka, all baked into individual, irresistible buns. This recipe is a showstopper for any occasion, offering a unique and satisfying texture and flavor profile that is sure to impress. Imagin extracte the warm, flaky layers giving way to a fragrant, spiced nut filling, all finished with that signature syrupy glaze. It’s a sensory experience you won’t soon forget!
These buns are incredibly versatile. They make a fantastic brunch treat, a decadent dessert, or even an elegant afternoon pick-me-up with a cup of coffee or tea. For serving, I love to present them slightly warm, allowing the syrupy glaze to be wonderfully gooey. They also stand beautifully on their own, but if you’re feeling extra indulgent, a dollop of lightly sweetened whipped cream or a small scoop of vanilla bean ice cream would be divine.
Don’t be afraid to get creative with variations! You could try different nut combinations like pistachios and almonds, or even add a pinch of cardamom or cinnamon to the nut filling for an extra layer of spice. For a chocolate twist, you could incorporate some finely chopped dark chocolate into the filling. The possibilities are truly endless!
I genuinely encourage you to give this Baklava Babka Bun recipe a try. It might seem a little involved, but the process is incredibly rewarding, and the end result is absolutely worth every step. You’ll be amazed at how delicious and impressive these homemade delights turn out.
Frequently Asked Questions:
Can I make the dough ahead of time?
Absolutely! The babka dough can be made a day in advance and stored, covered, in the refrigerator. This actually makes it easier to handle and roll out for filling. Just let it come to room temperature for about 30-60 minutes before shaping the buns.
How should I store leftover Baklava Babka Buns?
Store any leftover buns in an airtight container at room temperature for up to 2-3 days. If they become a little dry, you can gently warm them in a low oven for a few minutes before serving to refresh their texture.
What kind of nuts are best for the filling?
Walnuts and pistachios are classic choices and work wonderfully here, echoing traditional baklava flavors. However, feel free to experiment with almonds, pecans, or a mix of your favorites. Just be sure they are finely chopped for optimal distribution within the swirl.
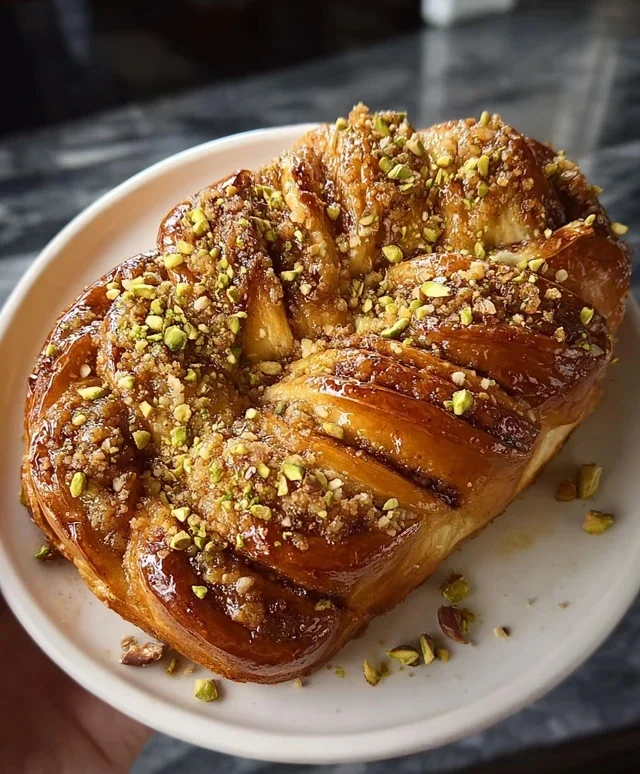
Baklava Babka Buns
A delightful fusion of flaky baklava and rich babka, these buns are swirled with cinnamon-nut filling and finished with a sweet honey glaze.
Ingredients
-
3 ½ cups all-purpose flour
-
¼ cup granulated sugar
-
1 packet (2 ¼ tsp) instant yeast
-
½ cup warm milk
-
2 eggs
-
½ cup unsalted butter, melted
-
½ tsp salt
-
1 cup walnuts, finely chopped
-
½ cup pistachios, finely chopped
-
¼ cup granulated sugar
-
1 tbsp cinnamon
-
¼ cup unsalted butter, melted
-
½ cup honey
-
¼ cup water
-
1 tsp vanilla extract
Instructions
-
Step 1
In a large bowl, combine flour, sugar, yeast, and salt. In a separate bowl, whisk together warm milk, eggs, and melted butter. Add wet ingredients to dry ingredients and mix until a shaggy dough forms. -
Step 2
Knead the dough on a lightly floured surface for 8-10 minutes until smooth and elastic. Place in a greased bowl, cover, and let rise in a warm place for 1-1.5 hours, or until doubled in size. -
Step 3
While the dough rises, prepare the filling: In a medium bowl, combine chopped walnuts, pistachios, sugar, and cinnamon. -
Step 4
Once the dough has risen, punch it down and turn it out onto a lightly floured surface. Roll the dough into a large rectangle (about 12×18 inches). -
Step 5
Spread the remaining ¼ cup melted butter evenly over the dough, leaving a ½-inch border. Sprinkle the nut and cinnamon mixture evenly over the butter. -
Step 6
Starting from the long edge, tightly roll up the dough into a log. Cut the log into 12 equal pieces. -
Step 7
Place the buns cut-side up into a greased baking dish. Cover and let rise for another 30-45 minutes. -
Step 8
Preheat oven to 350°F (175°C). Bake for 25-30 minutes, or until golden brown and cooked through. -
Step 9
While the buns are baking, prepare the glaze: In a small saucepan, combine honey, water, and vanilla extract. Heat gently until warmed through. Do not boil. -
Step 10
As soon as the buns come out of the oven, brush the warm honey glaze generously over the tops. Let cool slightly before serving.
Important Information
Nutrition Facts (Per Serving)
It is important to consider this information as approximate and not to use it as definitive health advice.
Allergy Information
Please check ingredients for potential allergens and consult a health professional if in doubt.